Nutella Mummy Hand Pies: Spookily Sweet Treats
Spookily Sweet and Oh-So-Tasty
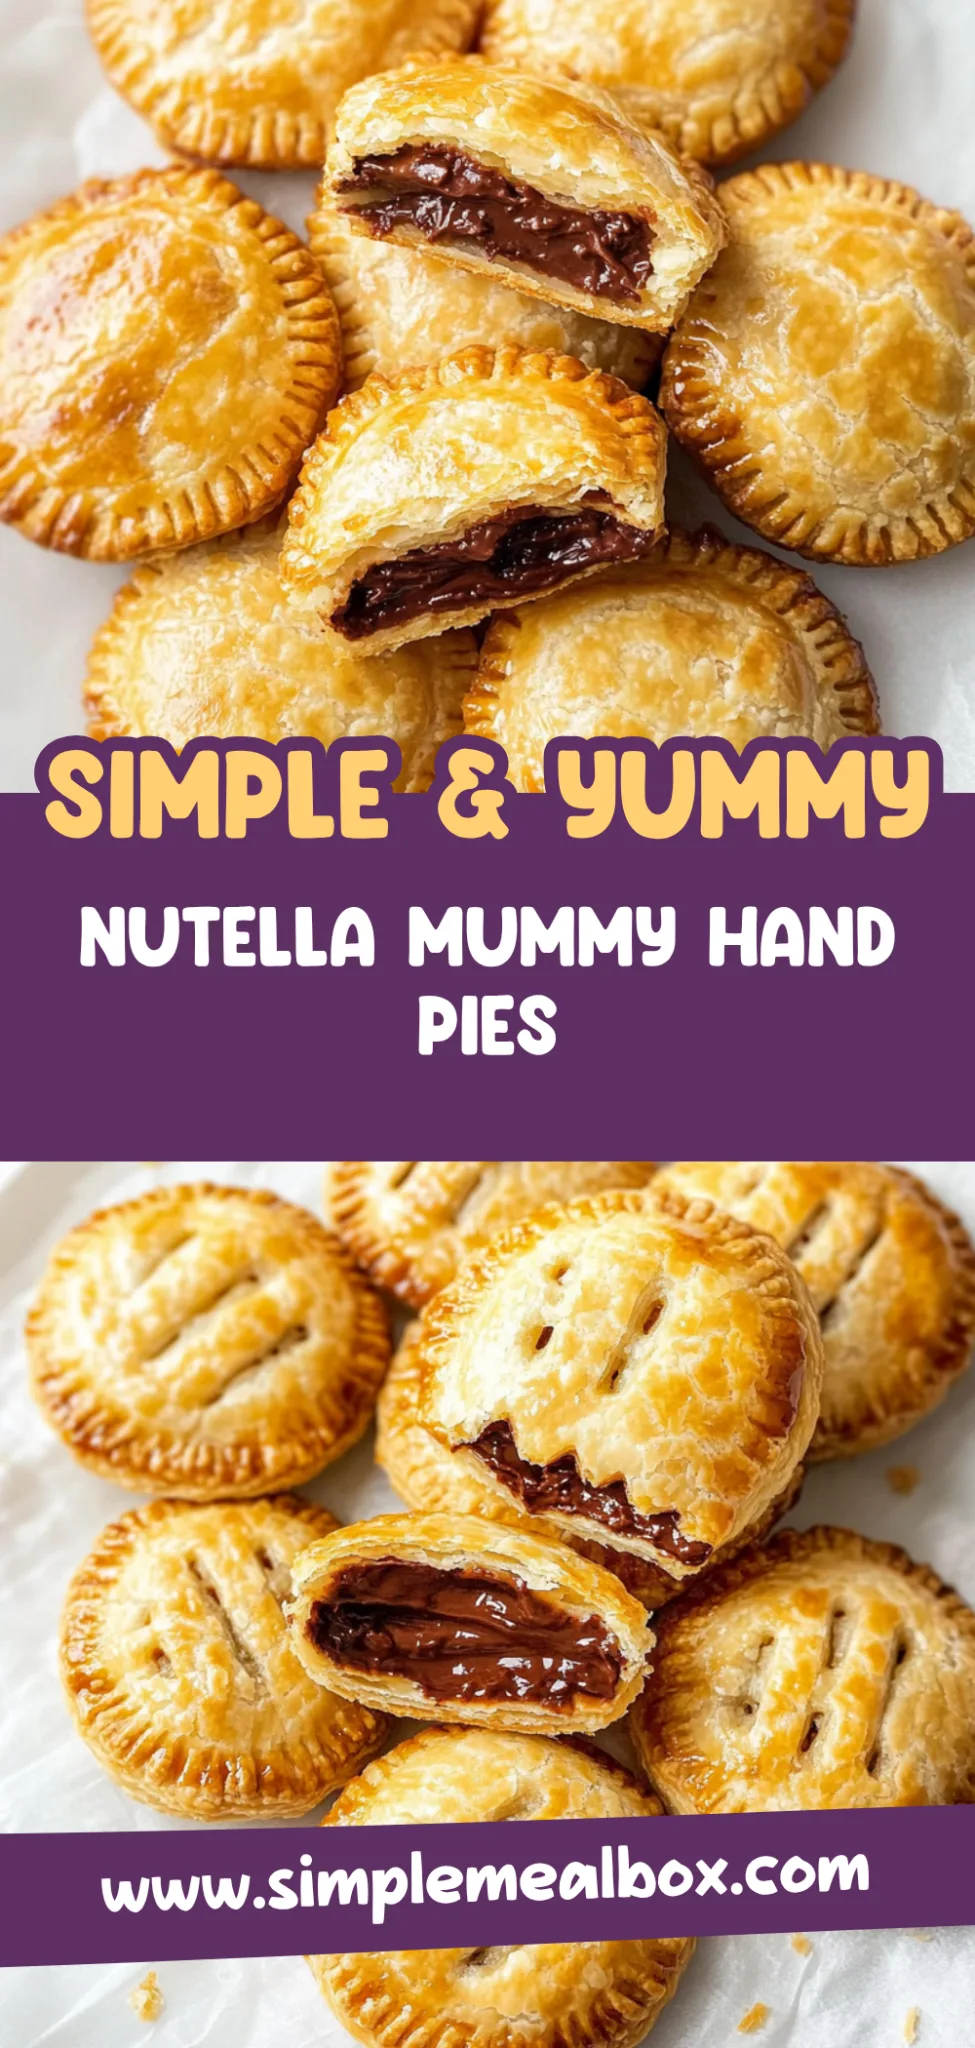
There’s something magical about Halloween that brings out the kid in all of us, and this year, I decided to whip up a batch of Nutella Mummy Hand Pies to celebrate. The moment I pulled them from the oven, the warm, gooey Nutella filling filled my kitchen with an irresistible aroma, and I knew I had a winner on my hands. They’re not just delicious; their flaky crust and rich chocolatey center make them a perfect treat for any spooky occasion.
What makes these little hand pies truly special is how they come to life with a simple decoration of icing that transforms them into adorable mummies. Every time I serve them, the delighted gasps from friends and family are absolutely priceless, making them an ideal treat for Halloween parties or cozy family nights at home. They’re easy enough that even the kids can help out, making your celebration more fun and memorable.
To elevate your Nutella Mummy Hand Pies experience, pair them with a scoop of vanilla ice cream or a drizzle of caramel sauce for an extra touch of indulgence. Trust me, once you take that first bite, you’ll feel like a kid again—excited to share these delightful treats with everyone around you. Get ready to embrace the Halloween spirit and create some sweet memories in your kitchen!
What are Nutella Mummy Hand Pies?
Nutella Mummy Hand Pies are delightful, flaky pastries that combine the fun of Halloween with the irresistible taste of chocolate hazelnut spread. Made using a package of pre-made pie crust, these hand pies are filled with creamy Nutella and topped with simple decorations like white icing for mummy bandages and chocolate chips for eyes. The result is a crispy exterior that gives way to a tender, gooey filling, perfect for indulging your sweet tooth. Baked in the oven, they are not only easy to prepare but also require minimal cleanup, making them a fantastic treat for both kids and adults alike.
Perfect For:
Spooky Celebrations: These Nutella Mummy Hand Pies are the ultimate Halloween treat, adding a fun and festive touch to any spooky gathering or classroom party.
Family Fun Nights: Get the kids involved in the kitchen by letting them help decorate these adorable hand pies; it’s a delightful way to spend quality time together while creating tasty memories.
Budget-Friendly Treats: With just a few simple ingredients, you can whip up these impressive-looking desserts without breaking the bank, making them perfect for those who want to celebrate without overspending.
Cozy Movie Marathons: Snuggle up with your favorite Halloween flick and enjoy these warm, gooey hand pies as the perfect sweet snack, ensuring that your cozy night in feels extra special.
Nutella Mummy Hand Pies Ingredients
For the Crust
- 1 package pre-made pie crust (thawed) – This convenient crust saves time and ensures a flaky, buttery base for your Nutella Mummy Hand Pies.
For the Filling
- 1/2 cup Nutella – Rich and creamy, this chocolate-hazelnut spread is the star of your hand pies, bringing a delightful sweetness.
For the Egg Wash
- 1 large egg (beaten) – The egg wash helps create a golden-brown finish on the pastry, making your mummies look irresistibly appetizing.
- 1 tablespoon water – Mixing with the beaten egg helps thin it out for an even application on the pie crust.
For the Decorations
- 1/2 cup white icing (for mummy bandages) – This sweet icing adds a fun and spooky touch to your mummies, resembling their bandaged wraps.
- 12 small chocolate chips (for eyes) – Use these tiny chocolate morsels to give your mummies their adorable little eyes, enhancing their charm.
Kitchen Equipment You’ll Need
- Baking sheet
- Parchment paper
- Rolling pin
- Hand pie cutter or round cutter
- Fork
- Small bowl
- Pastry brush
How to Make Nutella Mummy Hand Pies
Step 1:
Preheat your oven to 375°F (190°C) and line a baking sheet with parchment paper. This will help ensure that your hand pies bake evenly and don’t stick, making cleanup a breeze later on.
Step 2:
On a lightly floured surface, roll out the pre-made pie crust to about 1/8 inch thick. This thickness will give you a nice, flaky crust that holds up well when baked and showcases that delicious Nutella filling.
Step 3:
Using a hand pie cutter or a round cutter, cut out circles from the dough. Place a tablespoon of Nutella in the center of half the circles, making sure not to overfill them so they seal properly.
Step 4:
Top with the remaining circles and seal the edges by pressing with a fork. This step is crucial for keeping all that yummy Nutella inside while they bake, so make sure to press firmly!
Step 5:
In a small bowl, mix the beaten egg with water. Brush the egg wash generously over the top of each hand pie to give them that beautiful golden brown color as they bake.
Step 6:
Bake in the preheated oven for 20-25 minutes or until golden brown. Keep an eye on them towards the end; you want them to be perfectly puffed and beautifully browned.
Step 7:
Once cooled, use the white icing to create bandage patterns on the pies and place two chocolate chips on each for eyes. This final touch will make your mummy hand pies look adorable and add that festive flair!
Tips
- Keep the crust cold: Make sure your pie crust remains chilled until you’re ready to roll it out. A cold crust bakes up flakier and holds its shape better, resulting in a more delightful texture.
- Don’t overfill the pies: Stick to about a tablespoon of Nutella for each hand pie. Overfilling can cause the filling to leak out during baking, which can lead to messy results and uneven cooking.
- Seal edges well: Use a fork to press down on the edges firmly to seal them. This not only prevents the filling from oozing out but also gives your pies a nice decorative touch.
- Watch for golden brown: Keep an eye on the baking time as ovens can vary; aim for a rich golden brown color on the top. This ensures your hand pies are fully cooked and gives them an appealing appearance.
- Cool before decorating: Allow your hand pies to cool completely before adding icing and chocolate chips. If they’re warm, the icing may melt, ruining that cute mummy look you want!
- Experiment with decorations: Feel free to get creative with icing patterns! Different designs can make each mummy unique, adding fun and personality to your Halloween treats.
Optional Ingredients
- Cream Cheese: Adding a dollop of softened cream cheese to the Nutella filling creates a delightful creaminess that balances the sweetness and adds a rich texture.
- Cinnamon: A sprinkle of ground cinnamon in the filling or mixed into the icing gives a warm spice note that complements the chocolatey goodness of Nutella, enhancing its flavor profile.
- Chopped Nuts: Incorporate some finely chopped hazelnuts or almonds into the filling for a satisfying crunch and added nutty flavor that pairs perfectly with chocolate.
- Orange Zest: Grate a bit of fresh orange zest into your icing for a bright citrus twist that cuts through the richness of the pie, adding an aromatic freshness that elevates each bite.
- Caramel Sauce: Drizzle warm caramel sauce over the finished pies for an indulgent touch that adds sweetness and a luxurious feel, perfect for impressing your Halloween guests.
What to Pair with Nutella Mummy Hand Pies?
To balance the rich, sweet flavors of Nutella Mummy Hand Pies, consider serving a fresh arugula salad tossed with sliced pears and crumbled goat cheese. The peppery notes of arugula and the sweetness of the pears create a delightful contrast to the dessert-like quality of the hand pies. The creamy goat cheese adds a touch of richness, enhancing the overall taste experience while keeping your palate refreshed.
For a comforting side, roasted sweet potatoes drizzled with a hint of maple syrup would be an excellent choice. Their natural sweetness complements the Nutella filling, while their soft texture contrasts beautifully with the flaky hand pies. Additionally, the caramelized edges of roasted sweet potatoes provide a lovely depth of flavor that rounds out your meal perfectly.
A warm spiced apple cider is an ideal drink pairing that evokes the cozy spirit of fall and Halloween festivities. The cinnamon and clove notes in the cider enhance the chocolatey richness of the Nutella while offering a warming sensation that complements each bite. This drink not only refreshes but also adds an aromatic element to your gathering, making it feel all the more festive.
Enhance your dessert experience by serving vanilla ice cream on the side. The creamy, cold texture beautifully contrasts with the warm hand pies, creating a delightful mouthfeel that enhances each bite. Plus, adding a drizzle of chocolate sauce over the ice cream ties in seamlessly with the Nutella theme, elevating your treat to something truly indulgent.
Variations and Substitutions
Gluten-Free Pie Crust: Substitute the pre-made pie crust with a gluten-free option available at most grocery stores. This variation allows those with gluten sensitivities to enjoy the festive hand pies without sacrificing flavor or texture.
Peanut Butter Filling: Instead of Nutella, swap in creamy peanut butter for a savory twist that adds protein and a rich, nutty flavor. You can also blend in some honey or powdered sugar to sweeten it up, creating a delightful contrast with the icing.
Pumpkin Spice Filling: Mix 1/2 cup of pumpkin puree with cinnamon, nutmeg, and a touch of brown sugar for a seasonal take on the filling. This variation provides a warm, spiced flavor profile that perfectly complements the Halloween theme.
Dairy-Free Egg Wash: For a vegan alternative, replace the egg wash with a mixture of almond milk and maple syrup. This not only makes the hand pies vegan-friendly but also imparts a subtle sweetness to the crust.
Chocolate Hazelnut Spread Alternative: If you’re looking for something different from Nutella, try using other chocolate hazelnut spreads that are dairy-free or organic. Each brand offers its unique flavor profile while maintaining that beloved chocolatey goodness.
Savory Spinach and Feta Filling: For a savory twist, fill the hand pies with sautéed spinach and crumbled feta cheese instead of Nutella. The combination creates a delicious Mediterranean-inspired treat that balances well with the sweetness of the icing decorations.
Cinnamon Sugar Topping: After applying the egg wash, sprinkle some cinnamon sugar on top before baking for an extra layer of flavor. This crunchy topping will add warmth and sweetness, making your mummy hand pies even more irresistible!
How to Store
To store your Nutella Mummy Hand Pies in the refrigerator, allow them to cool completely before transferring them to an airtight container. They will keep well for up to 3 days. When you’re ready to enjoy them again, simply reheat in the oven at 350°F (175°C) for about 10 minutes, which helps restore their flaky texture and warm filling.
These hand pies can also be frozen for longer storage. While the texture may change slightly upon thawing, they still taste delicious after freezing. To freeze, place the cooled pies in a single layer on a baking sheet until solid, then transfer them to a freezer-safe container or zip-top bag. They can be kept frozen for up to 2 months. To reheat, thaw overnight in the fridge and warm in the oven as mentioned above for the best results.
FAQ
Can I use a different type of nut spread instead of Nutella?
Yes, you can definitely substitute Nutella with other nut spreads like almond butter or peanut butter. Just keep in mind that the flavor and sweetness will vary, so adjust your expectations accordingly.
How can I ensure my hand pies have a crispy crust?
To achieve a crispy crust, make sure to roll out the pie dough evenly and not too thick. Additionally, brushing the egg wash on top provides a nice golden finish that adds to the texture when baked.
Can I prepare the hand pies in advance and freeze them?
Absolutely! You can assemble the hand pies, freeze them unbaked, and then bake directly from frozen. Just increase the baking time by a few minutes until they are golden brown.
Is it possible to make these hand pies gluten-free?
Yes, you can use gluten-free pie crust available at most grocery stores. Be sure to check that all other ingredients, including the icing and chocolate chips, are gluten-free as well.
What happens if I don’t have a hand pie cutter?
If you don’t have a hand pie cutter, simply use a round cookie cutter or even a glass to cut out your circles. Just ensure they are uniform in size for even baking.
How should I store leftover mummy hand pies?
Store any leftover hand pies in an airtight container at room temperature for up to two days. If they last longer than that, consider refrigerating them for freshness but be aware they may lose some crispiness.
How do I know when my hand pies are done baking?
Your mummy hand pies are ready when they are golden brown on top and slightly puffed. Keep an eye on them during the last few minutes of baking to avoid over-baking.

Nutella Mummy Hand Pies
Ingredients
Method
- Preheat your oven to 375°F (190°C) and line a baking sheet with parchment paper.
- On a lightly floured surface, roll out the pre-made pie crust to about 1/8 inch thick.
- Using a hand pie cutter or a round cutter, cut out circles from the dough. Place a tablespoon of Nutella in the center of half the circles.
- Top with the remaining circles and seal the edges by pressing with a fork.
- In a small bowl, mix the beaten egg with water. Brush the egg wash over the top of each hand pie.
- Bake in the preheated oven for 20-25 minutes or until golden brown.
- Once cooled, use the white icing to create bandage patterns on the pies and place two chocolate chips on each for eyes.