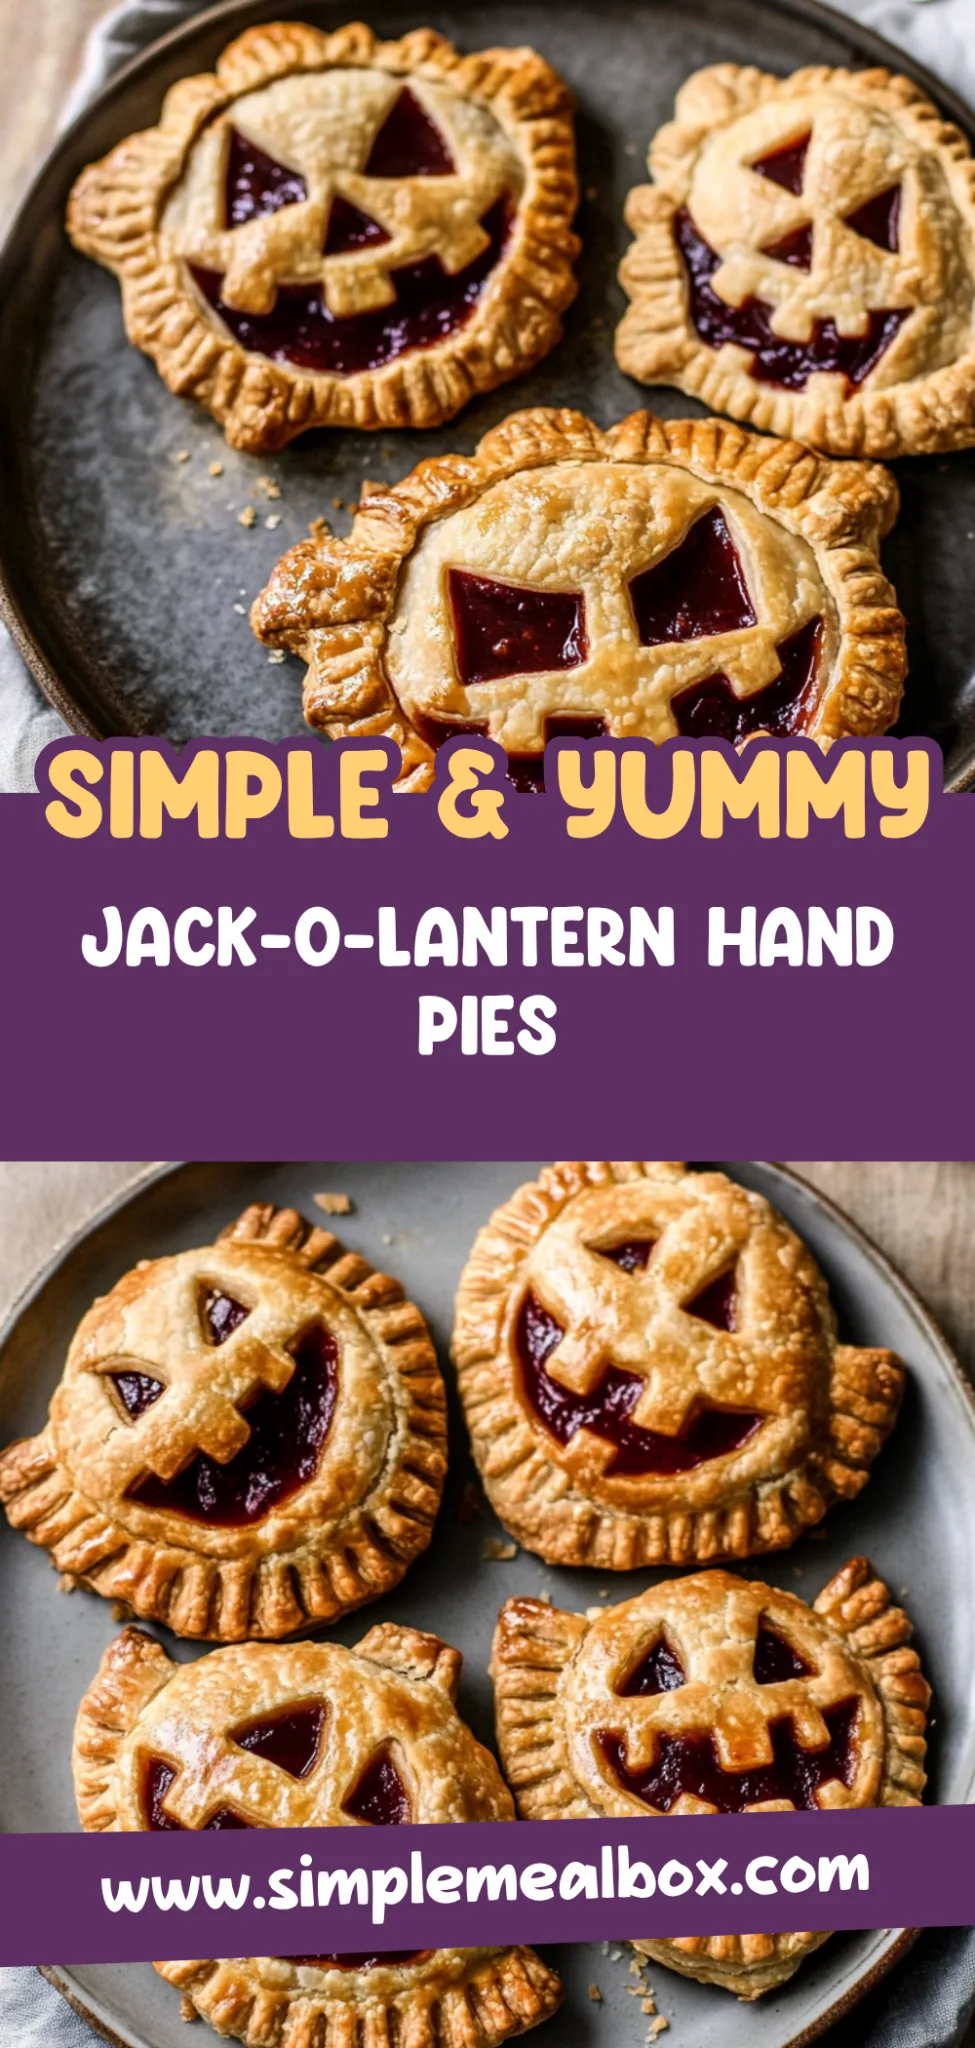
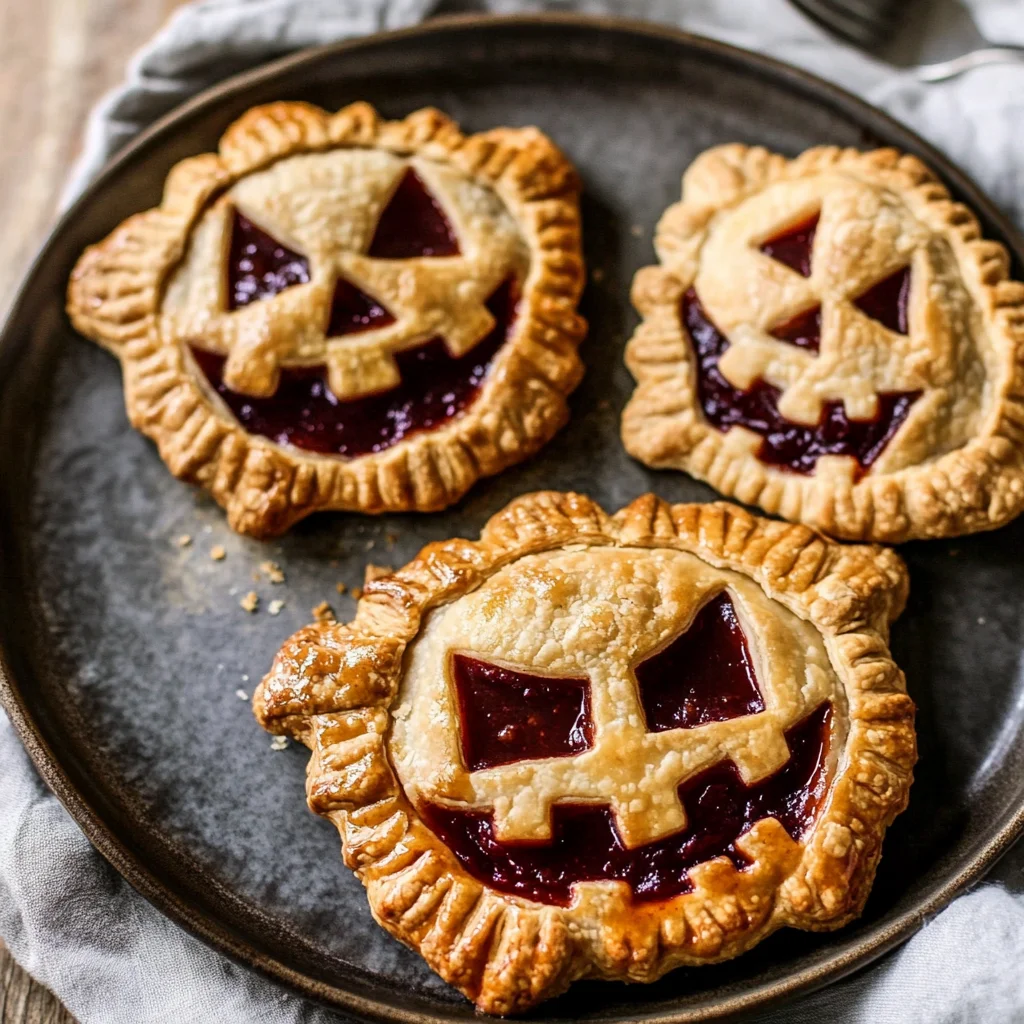
Jack-O-Lantern Hand Pies: Spooky and Sweet Treats
Delightfully Spooky and Sweet
Last Halloween, I decided to make something special for our little neighborhood gathering, and that’s when I stumbled upon the idea of Jack-O-Lantern Hand Pies. They were surprisingly easy to whip up, with a flaky crust enveloping a luscious pumpkin filling that was both comforting and festive. Each bite offered a delightful crunch followed by the warmth of spices—pure autumn bliss!
What truly makes these hand pies stand out is the enchanting aroma that fills your kitchen as they bake; it’s like an invitation to fall itself. Watching friends and family light up at the sight of these adorable jack-o-lanterns brings such joy, making them perfect for cozy dinners or Halloween parties. They’re sure to steal the show and keep everyone coming back for more.
Serve these delectable treats warm with a scoop of vanilla ice cream or a drizzle of caramel sauce for an extra touch of indulgence. Whether you’re enjoying them on a crisp evening or sharing them with loved ones under twinkling lights, these Jack-O-Lantern Hand Pies will fill your home with warmth and laughter. Let’s get baking and bring some festive cheer into our kitchens!
What are Jack-O-Lantern Hand Pies?
Jack-O-Lantern Hand Pies are delightful little pastries that celebrate the spirit of Halloween with their charming pumpkin shape and filling. These handheld treats feature a flaky crust made from all-purpose flour, cold cubed unsalted butter, a touch of salt, and just enough ice water to bring it all together. Filled with a warm mixture of pumpkin puree, brown sugar, cinnamon, and nutmeg, they offer a perfect balance of crispy exterior and tender, spiced interior. Baked in the oven until golden brown, these pies not only satisfy your sweet tooth but also make cleanup a breeze, as they require minimal effort and can be enjoyed straight from your hands!
Perfect For:
Halloween Parties: These festive jack-o-lantern hand pies are not only adorable but also a fun and tasty treat that will delight both kids and adults at any Halloween gathering.
Family Baking Days: Gather the whole family in the kitchen to create these easy-to-make hand pies together. They’re perfect for bonding over pumpkin filling and creative jack-o-lantern designs!
Cozy Fall Nights: Enjoy a warm, comforting dessert on a chilly evening. The flaky crust and spiced pumpkin filling make these hand pies the ultimate cozy treat to enjoy with a cup of cider.
Budget-Friendly Treats: With simple ingredients and easy preparation, these hand pies are an affordable way to celebrate the season without breaking the bank, all while bringing smiles to everyone’s faces!
Jack-O-Lantern Hand Pies Ingredients
For the Crust
- 2 cups all-purpose flour – This is the foundation of your hand pies, providing a flaky and tender texture.
- 1 cup unsalted butter (cold and cubed) – Cold butter helps create a light, flaky crust; don’t let it soften!
- 1/2 teaspoon salt – A small amount enhances the flavor of the crust beautifully.
- 1/4 cup ice water – Use ice-cold water to bind the dough without warming up the butter.
For the Filling
- 1 cup canned pumpkin puree – It offers a rich, creamy filling that’s both delicious and seasonal for your Jack-O-Lantern Hand Pies.
- 1/2 cup brown sugar – Adds sweetness and depth to balance the spices in your filling.
- 1 teaspoon cinnamon – A warm spice that brings out the cozy flavors of fall.
- 1/2 teaspoon nutmeg – This adds a hint of warmth and aromatic complexity to your pumpkin filling.
- 1 egg beaten (for egg wash) – Brushing with egg wash gives your hand pies a beautiful golden finish when baked.
Kitchen Equipment You’ll Need
- Mixing bowl
- Pastry cutter or fork
- Plastic wrap
- Rolling pin
- Cookie cutter
- Baking sheet
- Pastry brush
How to Make Jack-O-Lantern Hand Pies
Step 1:
In a mixing bowl, combine 2 cups of all-purpose flour and 1/2 teaspoon of salt. Next, add in the cold, cubed unsalted butter and mix everything together until the mixture resembles coarse crumbs. This will create a flaky texture for your pie crust.
Step 2:
Gradually add 1/4 cup of ice water to the mixture, stirring until the dough just comes together. Once combined, divide the dough into two discs, wrap them in plastic wrap, and refrigerate for about 30 minutes. This chilling step is crucial for achieving that perfect pie crust texture.
Step 3:
While the dough is chilling, prepare your filling. In a separate bowl, mix together 1 cup of canned pumpkin puree, 1/2 cup of brown sugar, 1 teaspoon of cinnamon, and 1/2 teaspoon of nutmeg. Stir until everything is well combined and set aside; this delicious filling will bring your hand pies to life!
Step 4:
Preheat your oven to 375°F (190°C). Take one disc of chilled dough and roll it out on a floured surface until it’s about 1/8 inch thick. This thickness will ensure that your hand pies bake evenly and become delightfully flaky.
Step 5:
Using a cookie cutter, cut out shapes for the pies from the rolled-out dough. Place half of these shapes onto a baking sheet lined with parchment paper. The cookie cutter shape can be anything festive you desire—just make sure they are large enough to hold some filling!
Step 6:
Spoon about a tablespoon of your pumpkin filling onto each shape on the baking sheet. Be careful not to overfill them! Use the remaining cut-out shapes to cover each filled piece and press down around the edges with a fork to seal them tightly.
Step 7:
To allow steam to escape while they bake, cut small slits into the tops of each hand pie. Finally, brush the tops with the beaten egg; this will give your pies a beautiful golden-brown color as they bake in the oven.
Step 8:
Bake your Jack-O-Lantern hand pies in the preheated oven for about 25 minutes or until they are golden brown. Keep an eye on them as they bake; once they’re beautifully browned and puffed up, take them out and let them cool before enjoying these festive treats!
Tips
- Chill the butter: Using cold butter helps create a flaky texture in the pie crust. It prevents the butter from fully incorporating, leaving small pockets that will puff up during baking.
- Don’t overwork the dough: Mixing too much can lead to tough crusts. Work just until the ingredients come together for a tender and flaky finish.
- Roll out evenly: Aim for about 1/8 inch thickness when rolling out the dough. This ensures even cooking and helps avoid undercooked spots in your hand pies.
- Seal edges well: Use a fork to crimp the edges tightly after filling. A good seal prevents leaks during baking, keeping all that delicious pumpkin filling inside.
- Watch the bake time: Keep an eye on your hand pies as they bake; every oven is different. Look for a golden brown color as a sign they are done, which indicates a perfectly crisp crust.
- Let cool before serving: Allowing hand pies to cool for a few minutes after baking helps set the filling and makes them easier to handle, preventing burns and preserving flavors.
Optional Ingredients
- Cream cheese: Add a dollop of cream cheese to the pumpkin filling for a rich, tangy contrast that enhances the sweetness of the pie. Blend it in with the pumpkin puree for a smooth texture.
- Cayenne pepper: A pinch of cayenne pepper can elevate your hand pies with a subtle kick, balancing the sweetness of the filling. Mix it into the pumpkin filling to add depth and warmth.
- Caramelized onions: Incorporate finely chopped caramelized onions into the filling for an earthy, savory note that beautifully complements the pumpkin flavors. Sauté until golden brown before adding.
- Zest of an orange: Brighten up your pies with a teaspoon of fresh orange zest, which adds a refreshing citrus aroma and flavor that pairs wonderfully with pumpkin. Stir it into the filling for a delightful twist.
- Maple syrup glaze: Drizzle a warm maple syrup glaze over the baked hand pies for an extra touch of sweetness and shine. Simply warm maple syrup on the stove and brush it on right before serving for a beautiful finish.
What to Pair with Jack-O-Lantern Hand Pies?
To complement the sweet and spiced flavors of your Jack-O-Lantern hand pies, consider serving a fresh arugula salad dressed with a light vinaigrette. The peppery notes of arugula provide a delightful contrast to the sweetness of the pumpkin filling, while the acidity from the vinaigrette can help balance out the richness of the buttery crust. Toss in some sliced apples or dried cranberries to add a hint of tartness and extra texture that will elevate each bite.
Steamed or roasted vegetables also make an excellent pairing for these festive hand pies. Consider buttery Brussels sprouts or roasted carrots seasoned with a touch of honey and thyme. The natural sweetness of the vegetables complements the pumpkin filling beautifully, while their earthy flavors add depth to the meal. Plus, the vibrant colors make your table setting even more inviting for Halloween gatherings.
For a comforting side option, serve warm cornbread alongside your hand pies. Its slightly sweet flavor harmonizes well with the pumpkin’s spices, creating a cozy fall atmosphere at your table. The crumbly texture of cornbread offers a delightful contrast to the flaky pie crust, making each bite feel complete and satisfying.
Lastly, don’t forget to pair these hand pies with a spiced apple cider or a lightly chilled white wine like Riesling. The crisp acidity and fruity notes in Riesling highlight the spices in the filling without overwhelming them, while spiced apple cider adds warmth and enhances those autumnal flavors. This combination will invigorate your palate and round out your Halloween feast perfectly.
Variations and Substitutions
Gluten-Free Flour: Substitute all-purpose flour with a gluten-free flour blend to cater to those with gluten sensitivities. This swap will yield a slightly different texture, but still provides a deliciously flaky crust that pairs wonderfully with the sweet pumpkin filling.
Coconut Oil Instead of Butter: For a dairy-free option, replace unsalted butter with solid coconut oil. This change will impart a subtle coconut flavor to the crust while maintaining its flakiness, making it perfect for those avoiding dairy.
Maple Syrup for Brown Sugar: Swap brown sugar for pure maple syrup in the pumpkin filling to add a unique depth of flavor and natural sweetness. Adjust the quantity slightly by reducing the liquid in the filling to maintain consistency, resulting in a delightful autumnal twist.
Savory Spinach Filling: Transform your hand pies into a savory treat by replacing pumpkin puree with sautéed spinach and ricotta cheese. This veggie-packed variation creates a deliciously creamy and rich filling, perfect for those who prefer savory over sweet.
Chili Powder Kick: Add a teaspoon of chili powder or cayenne pepper to the pumpkin filling for an unexpected spicy twist. This addition will elevate the flavor profile and create an exciting contrast between the sweetness of the pumpkin and the heat from the spices.
Pecan Crust Variation: Replace half of the all-purpose flour with finely chopped pecans for an earthy nutty crust. This adds an incredible crunch and depth of flavor, enhancing both texture and taste while complementing the sweet filling beautifully.
How to Store
To store your Jack-O-Lantern Hand Pies in the refrigerator, allow them to cool completely after baking. Place them in an airtight container with parchment paper between layers to prevent sticking. They will keep well in the fridge for up to 3 days. To reheat, simply pop them in a preheated oven at 350°F (175°C) for about 10-15 minutes, which will help restore their flaky texture.
These hand pies freeze beautifully, though you may notice a slight change in texture after thawing. For best results, wrap each pie tightly in plastic wrap and then place them in a freezer-safe bag or container to prevent freezer burn. They can be frozen for up to 2 months. When you’re ready to enjoy, thaw them overnight in the refrigerator and reheat using the same method as above for optimal crispiness.
FAQ
Can I use a different type of flour for the pie crust?
Yes, you can substitute all-purpose flour with a gluten-free blend or whole wheat flour. Keep in mind that using alternative flours may alter the texture slightly, so you may need to adjust the amount of water added to achieve the right consistency.
How do I prevent my hand pies from getting soggy?
To avoid sogginess, ensure your pumpkin filling isn’t too wet before assembly. You can also bake the hand pies on a preheated baking sheet, which helps achieve a crispier bottom crust.
Can I make the pie crust ahead of time?
Absolutely! You can prepare the pie crust up to two days in advance. Just wrap it tightly in plastic wrap and store it in the refrigerator until you’re ready to roll it out and assemble your hand pies.
Is there an alternative to butter for making the pie crust?
Yes, you can use coconut oil or margarine as a substitute for unsalted butter. If you’re using coconut oil, make sure it’s solid and not melted for the best texture in your crust.
How do I know when my hand pies are done baking?
The hand pies are done when they are golden brown on top and firm to the touch. You can also check for a slight bubbling around the edges, which indicates that the filling is heated through.
Can I freeze the assembled but unbaked hand pies?
Yes, you can freeze them! Assemble the hand pies and place them on a baking sheet in the freezer until they’re firm. Once frozen, transfer them to an airtight container or freezer bag. Bake from frozen, adding a few extra minutes to the baking time.
What kind of cookie cutter should I use for shaping my hand pies?
A standard round or pumpkin-shaped cookie cutter works best for creating jack-o-lantern hand pies. If you want more decorative designs, consider using various cutters that match your Halloween theme!
Jack-O-Lantern Hand Pies
Ingredients
Method
- In a mixing bowl, combine flour and salt. Add cold butter and mix until crumbly.
- Gradually add ice water, mixing until the dough comes together. Divide into two discs, wrap in plastic, and refrigerate for 30 minutes.
- In a bowl, mix pumpkin puree, brown sugar, cinnamon, and nutmeg until well combined.
- Preheat the oven to 375°F (190°C). Roll out one disc of dough on a floured surface to about 1/8 inch thick.
- Use a cookie cutter to cut out shapes for the pies. Place half of the shapes on a baking sheet.
- Spoon a tablespoon of pumpkin filling onto each shape. Use the remaining shapes to cover, sealing the edges with a fork.
- Cut small slits for steam and brush the tops with beaten egg.
- Bake in the preheated oven for 25 minutes or until golden brown. Allow to cool before serving.